Full Walkthrough & Puzzle Solutions for System Shock 2023

System Shock 2023 is a true adaptation of the original game from 1994. The following is a complete guide with walkthroughs for all 5 missions.
This guide is based on the original game and should continue still be relevant for the remake since this is a 1:1 adaptation. Without further ado, here’s the comprehensive level by level walkthrough for all five missions.
Puzzles:
Missions:
Puzzles:
You’ll encounter two types of puzzles in the game. Solutions to puzzles will be posted shortly. In the meantime, here are some pointers to help you solve both kinds of puzzles.


Type 1
There is no guaranteed way to solve all puzzles, instead it’s all about trying and adjusting as you go.
- The idea is to try and get power level in between the two markings on the output meter, not to fill it up all the way. This involves plugging wires into ports on either side.
- Some wires add 1 power bar and some add 2. When you join them, their power adds up.
- Green wires add more power than blue ones, so you’ll need to keep switching between them and turning switches on and off to get the power level just right.
- One approach that could work is to focus on one wire at a time. Get it giving as much power as possible before you move on to the next one.
Type 2
These are relatively simpler to understand but can still be challenging to solve. The idea is to turn the knobs and alter the orange paths until you connect the two red points. You’ve got to be careful of 2 things – one: avoid dead-ends and two: turning the blue knobs turns many cells around it.
Missions
Laser Mission
You are tasked with preventing SHODAN from using the Tachyon Laser Mining Beam on Citadel Station to attack Earth. The Laser, which is usually used to mine minerals from moons and asteroids, has been repurposed by SHODAN to target Earth’s cities and force humanity into submission. You’re expected to disrupt this plan by making the laser explode while it’s shielded by a radiation shield. Here’s how you can achieve this, level by level:
Level 1 – Medical
- Start by finding and equipping yourself with a weapon and gear, along with a Group-1 access card from a locker. Find an information log and a Personal access card from D’Arcy’s office. This will aid you in moving forward in the game.
- You’ll have to solve a wire puzzle to activate a force bridge to the deconstructed area. At the lookout point, there’s a lever you need to pull to raise the force bridge. Another lever stops a cyborg conversion and reactivates standard regeneration; this step can be skipped but it also serves as your safety net in case you die.
- Your task in this level ends with you destroying computer nodes to gain access to the elevator. Make sure to record the number shown on a nearby screen for future use.
Level 2 – Research Labs
- Here, you’ll first have to throw the rightmost lever in the Alpha quadrant. Following this, find and take the Science Access Card from a dead cyborg drone in the Beta quadrant. You can also gain access through cyberspace.
- Another wire puzzle awaits you in the Library. Solving it activates the video screen from which you should record the laser safety override code. This is crucial for later stages. Before leaving this level, get the Isotope X-22 from the radioactive storeroom in the Gamma quadrant.
Level R – Reactor
- This level involves placing the Isotope X-22 into a receptacle in the Shield Generator room. Pull the lever there to activate the Shield Generator. Use the safety code you recorded from Level 2 on a keypad in the safety control room, then pull the safety override lever.
Level 2 – Research Labs Revisited
- Return to Level 2 and head to the Laser Control Center. Here, you’ll find a button that will allow you to fire the laser, completing your mission.
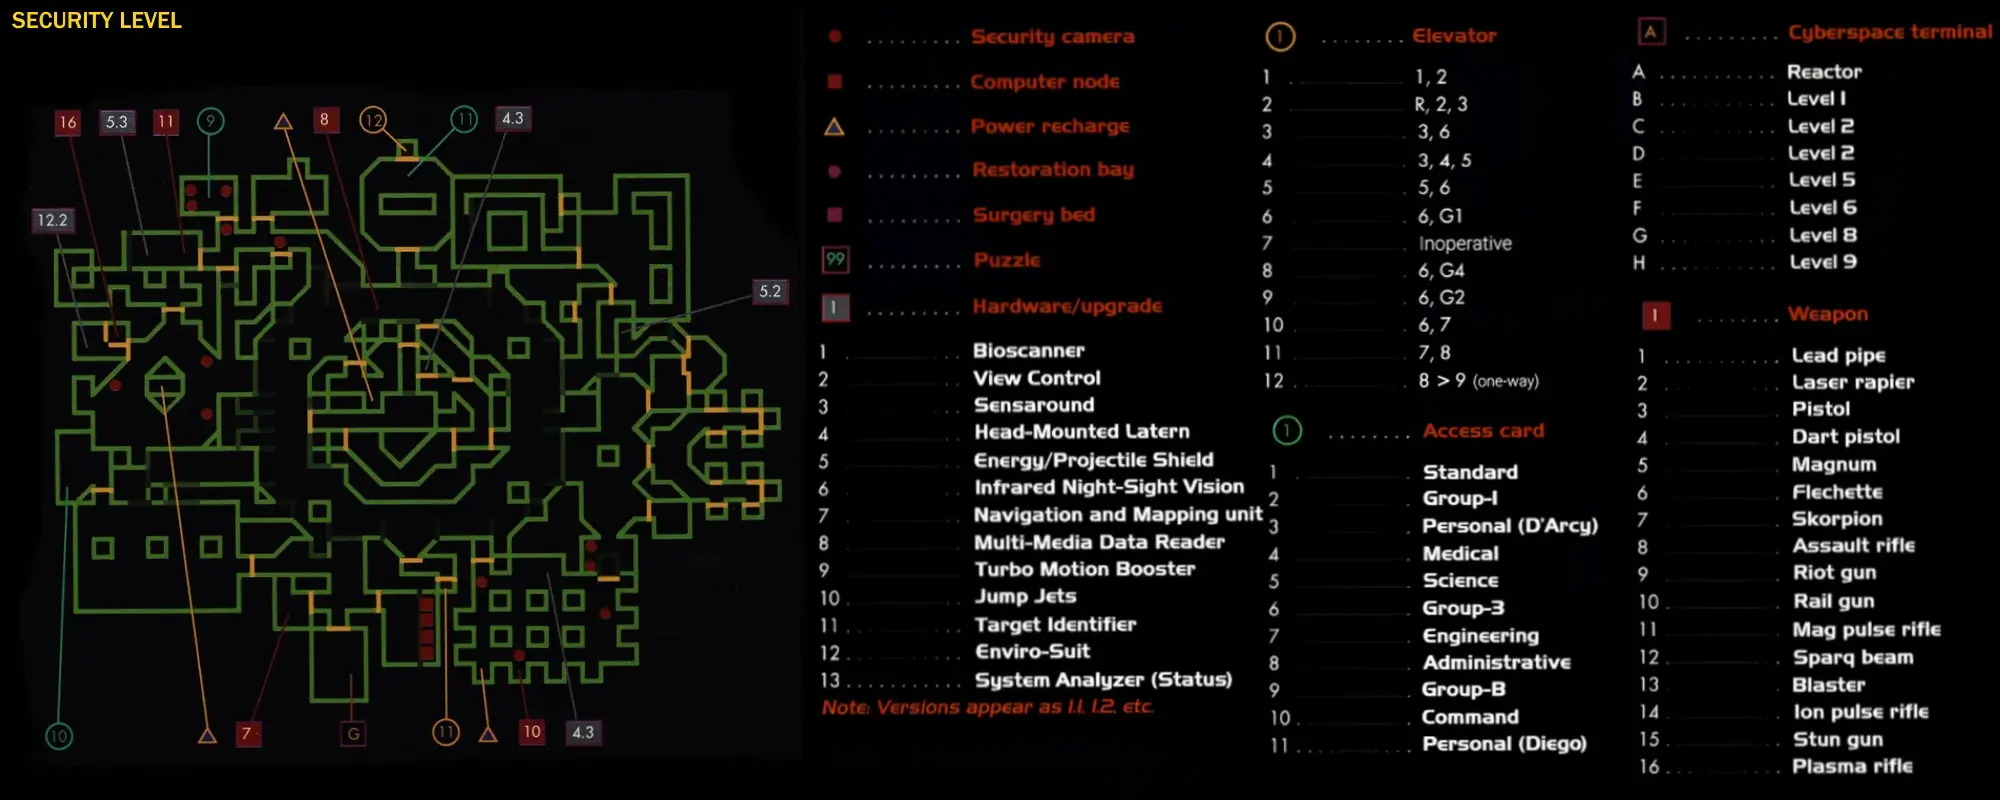
Maps:
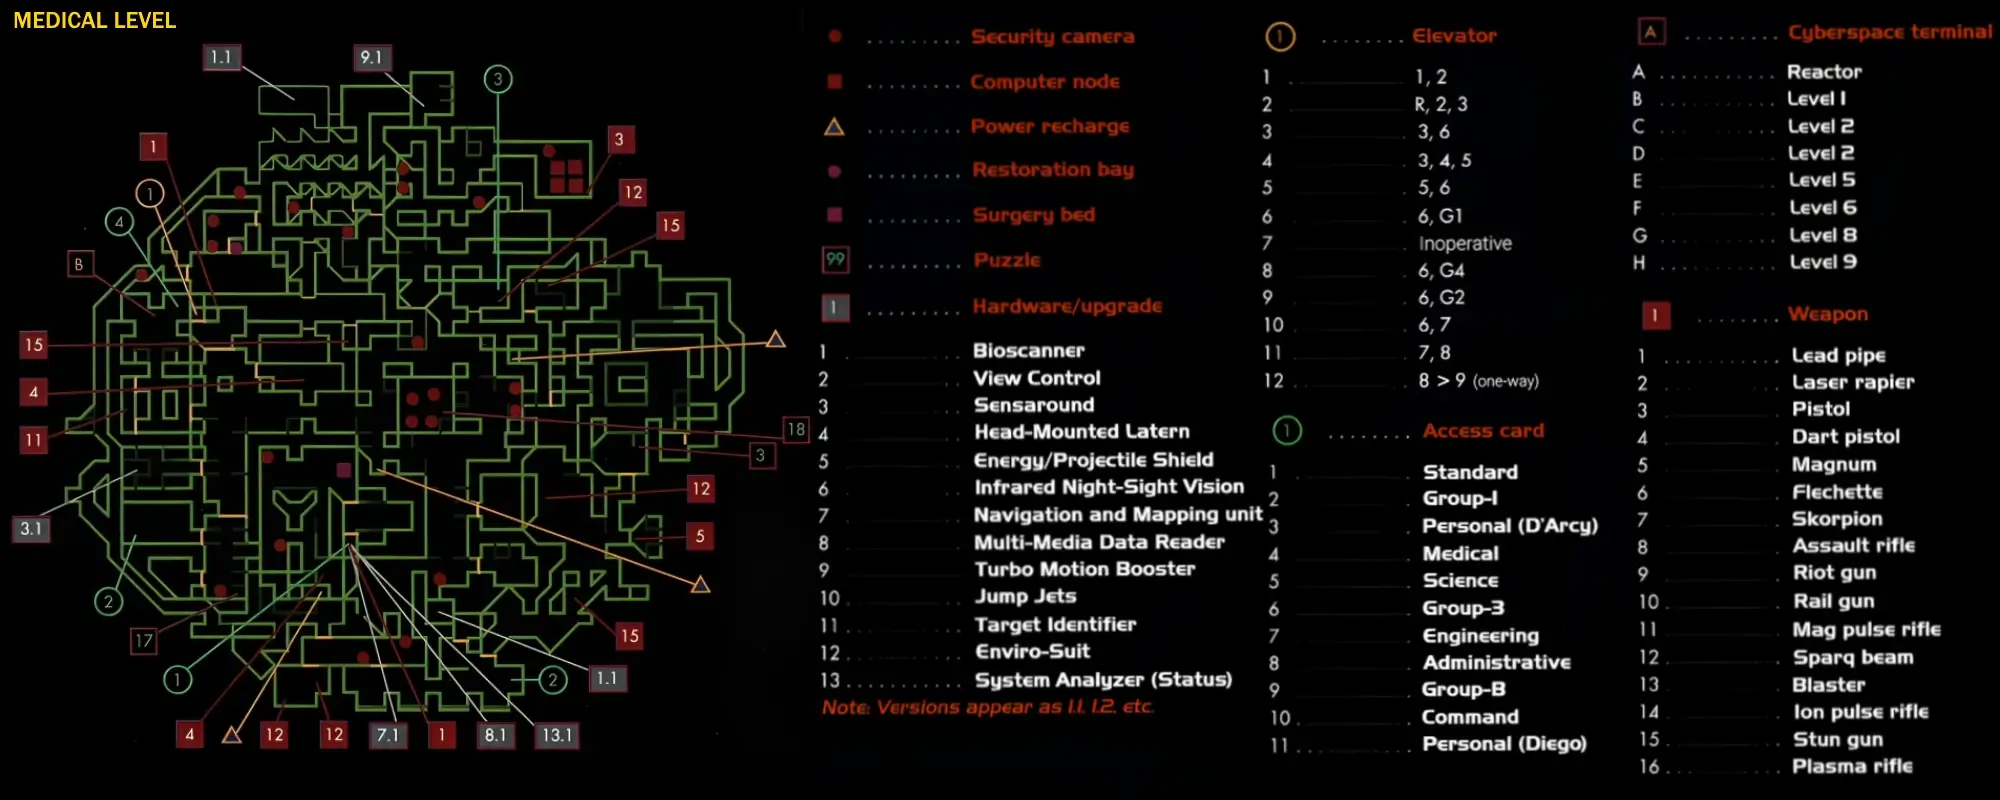
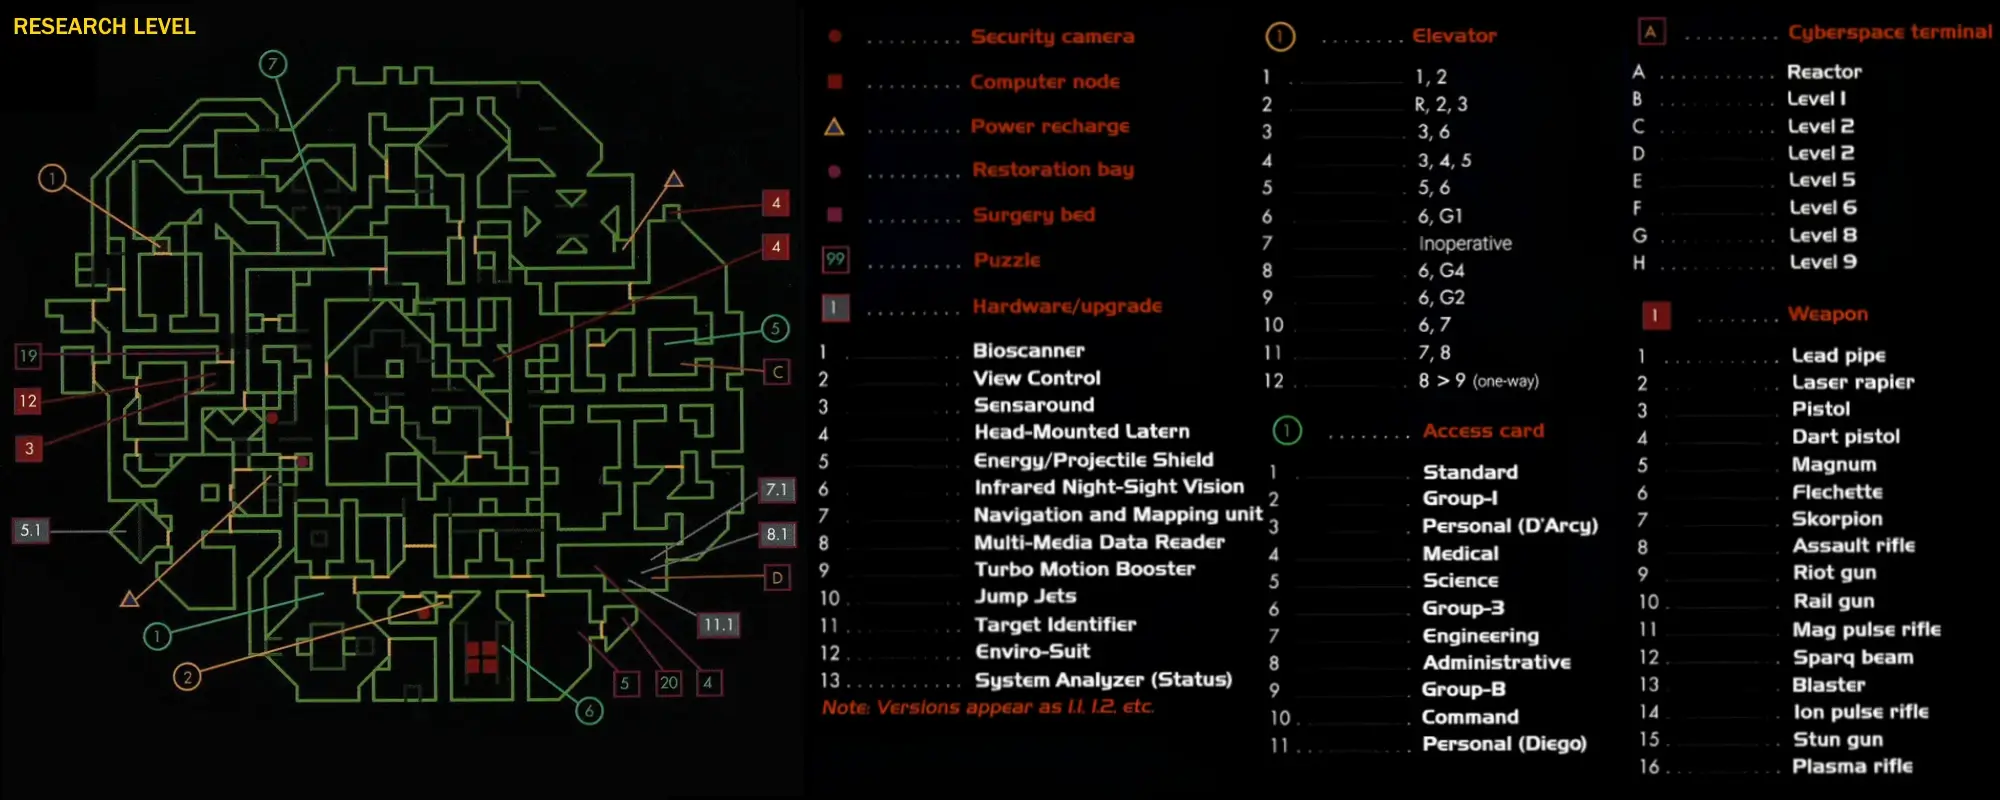
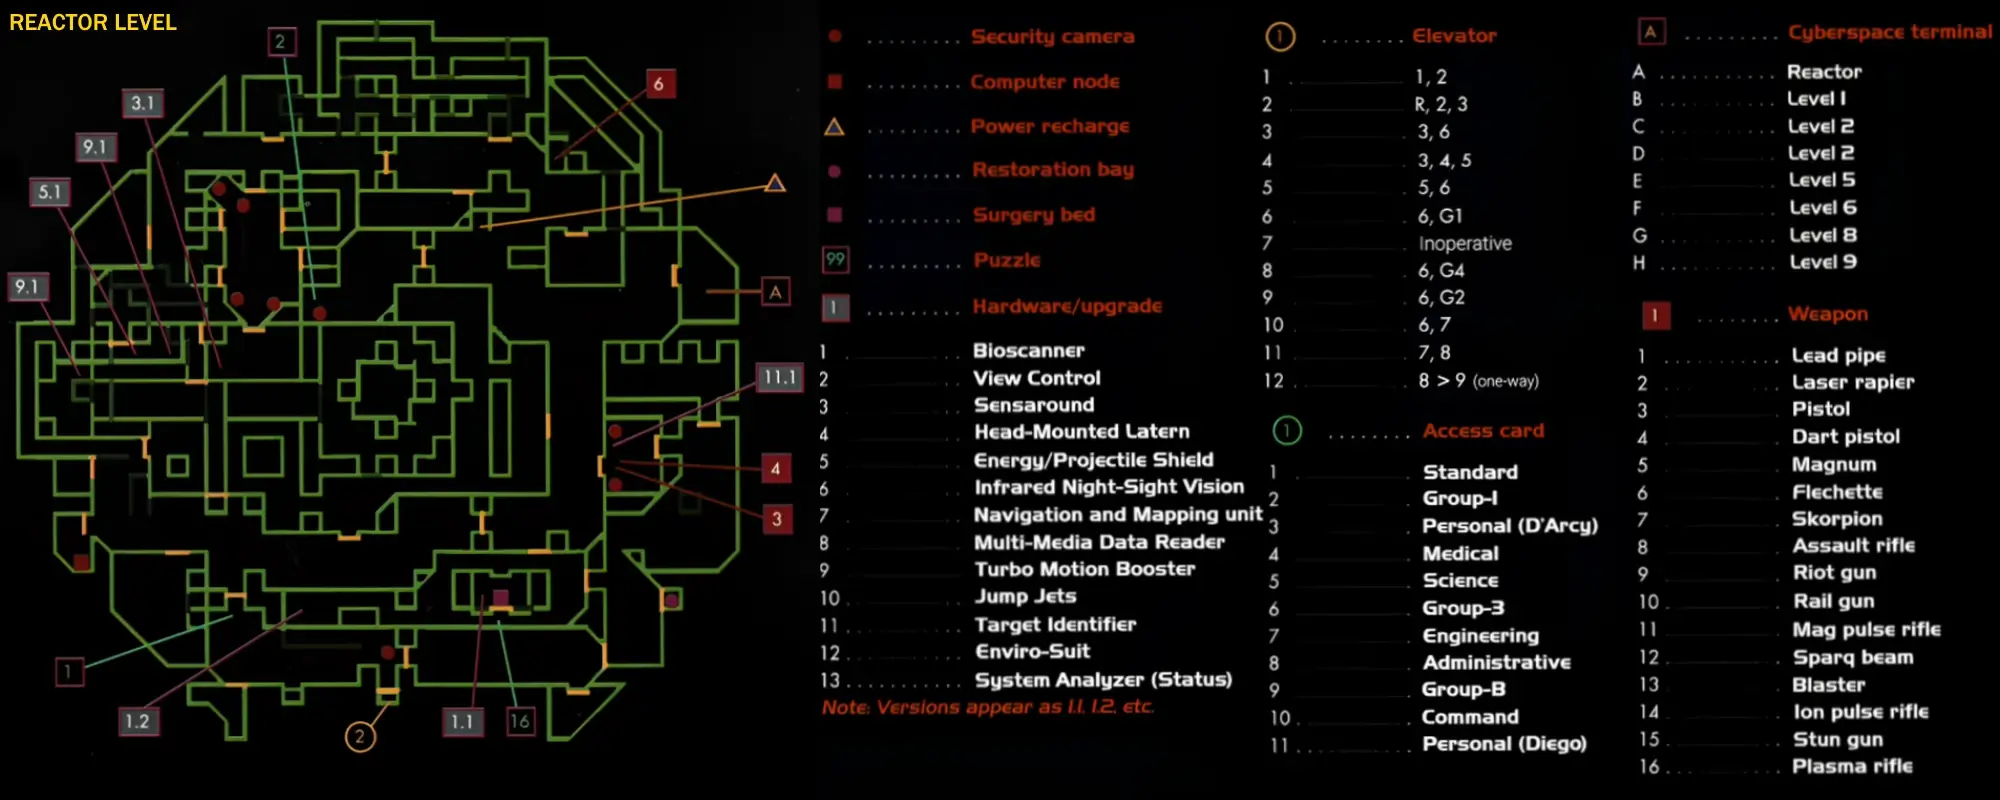
Step by Step Walkthrough:
- Get weapon and gear from personal locker.
- Get standard access card also in personal locker.
- Use surgery machine and Power station and fight serv-bots.
- Leave healing suite (combination 451).
- Go north through corridor and through airlock.
- Enter room to the left and acquire Sensuround MultiView Unit 1 and personal log.
- Return to hallway and enter next room to the left.
- Destroy Humanoid Mutant and Enter Cyberspace.
- In Cyberspace, unlock cyberlock and open security doors.
- Exit Cyberspace and take Medical Access Card.
- Enter the now unlocked doors and acquire the Magpulse.
- Head back to the hallway and travel East to the Central Hub.
- Eliminate Cyborg Drone and turn South.
- Head East again to the end of the hall and waste Cyborg Drone #2.
- Enter Secret entrance at the end of the hallway and find Nitro Pack.
- Exit Secret Alcove and battle Hopper.
- On East wall is a button that lowers the terrain elevator: press it.
- Ride terrain elevator up to the second floor.
- If he has not already attacked you, Cyborg Drone #3 will now do so, eliminate with extreme prejudice.
- Enter D’Arcy’s office and get information log from desk.
- Take terrain elevator down and go south from hub.
- Turn Right and then Left to enter Gamma Quadrant, proceed to end of hall.
- Turn right into garden area and enter gunfight with Cyborg Drone #4.
- Exit the other side of the grove and assassinate mutant.
- Enter first office on the left in this corridor (the Dead Body Room).
- Get access card from briefcase in far corner.
- Open blast door to carnage area with access card.
- Go generally northeast to second blast door, destroying mutants along the way.
- Activate force bridge by solving wire access puzzle.
- Cross bridge to plateau and turn left.
- Follow winding path to resistance hideout.
- Go north to guard’s nest and throw lever to raise force bridge.
- Backtrack along winding path from resistance hideout to new bridge.
- Cross bridge and go west to cyborg area.
- Make your way along the hallway to a repulsor lift.
- Step on repulsor lift which will raise you up to ledge.
- Walk on catwalks and head for the end of the hallway to the spot marked “HERE”.
- Go into first door on right (Cyborg conversion Chamber).
- Pull lever to activate resurrection for future.
- Find computer room in cyborg area to the northeast.
- Destroy computer nodes to reduce SHODAN’s control of the level.
- Head back to the Cyborg Conversion Room and into the hallway between there and the catwalks.
- In the middle of the hall is a doorway to the right, enter it.
- Through the hall, in the next room there is a button in the SW corner, push it.
- Go down the Terrain Elevator and to the Elevator.
- Take elevator to Level Two.
- Destroy the Mutant Posse that Awaits you at Level 2.
- Head W by SW to the end of the corridor and turn left.
- All the way to the end of the corridor to the room blocked off by a crate.
- On the East wall are two doors, the left door is the one you want, enter it.
- Drop down, enter Iris door on the left, and press the button in the next room.
- Enter next room and pull Cyborg Conversion lever.
- Step into the small alcove and ride the terrain elevator up to the Cyborg Conversion area.
- Head North and follow the Hallway around to the Alpha Quadrant.
- Enter Alpha Quad and pass the Iris door, taking the entrance to the right.
- Follow the Left wall to 4 levers in diamond pattern in the far right corner.
- Throw the rightmost lever to turn on lights in beta quadrant.
- Head back to the hallway and continue to follow it to Beta Quadrant.
- Deal with the Security Bot and follow the Beta Corridor to the windows (SPACE!).
- Turn left, then left again into Admin Security and eliminate the Drone.
- The drone will have SCI access cards in his front left pocket, take them.
- Exit the room and head right, following the windows to the Library.
- Enter the Library, Killing many men (Drones), and gather up equipment.
- Jump into Cyberspace and play around.
- Fix wire puzzle in library to activate video screen.
- Read laser safety override code from screen (remember it!).
- Exit Beta Quad back to the hallway and continue to follow it to Gamma Quadrant.
- Gamma Quad is guarded by a (soon to be dead) drone, enter here.
- Turn right and enter room at the end of the hallway.
- Get isotope X-22 from radioactive storeroom.
- Exit room and find computer nodes, destroy them, remember the number on the screen.
- Take elevator to Level R before you die!
- Head right from the Elevator and go through the next room into the Healing Area.
- Enable the Cyborg Conversion Chamber.
- Go back to the Elevator and head in the opposite direction, look for the room with wire puzzle by the door (Bonus points if you can do it in one move!).
- Enter the next area and open the first door on the left.
- Watch out for the Autobomb, then place Isotope X in the Isotope X receptacle (There’s a stretch).
- Pull the lever to activate the shields (Should get a v-mail).
- Head NW and look for a ramp in the floor, enter it and follow the maze to a drop-off.
- Drop off and enter shielded door to the right.
- There’s a dead Homeboy in here with pockets full of goodies. Take ’em. (He’s dead, he don’t need ’em.)
- Exit and climb the wall directly across from the door.
- Walk around the next corner and climb the wall to the N/NW.
- Follow this corridor around the corner and enter the first room on the right.
- Enter the room, watch in shock as the lights go out, and fight your way to the other door.
- In the next room is another Security -1 bot. You know what to do.
- In the corner of the floor there is a door marked Safety Override Access: go through it.
- Through the shielded door and turn right, killing the Execbot in the process.
- Head to the Repulsor lift and ride it up.
- Punch in the access code (199) and throw the lever.
- Flip the repulsor lift switch and ride back down to the dead Execbot.
- Follow the corridors all the way back to the elevator.
- TAKE ELEVATOR TO LEVEL 2.
- Go to the laser control center in the central hub.
- Fight a massive battle with many robots.
- Press the button to fire the laser.
- Head back to the elevator.
- TAKE ELEVATOR TO LEVEL 3.
Virus Mission
This mission is centered around a genetically engineered virus that SHODAN plans to release into Earth’s atmosphere to control humans. Citadel is primarily a research station that works on genetically engineered plants and related vaccines. However, SHODAN’s control of the station has led to the release of mutated specimens that now pose a threat to your survival within the game. Your goal is to stop SHODAN’s plan by getting rid of Beta Grove (G-2), where the virus is being cultivated. Here’s the process of doing that, according to the levels:
Level 3 – Maintenance
- Pick up lantern.
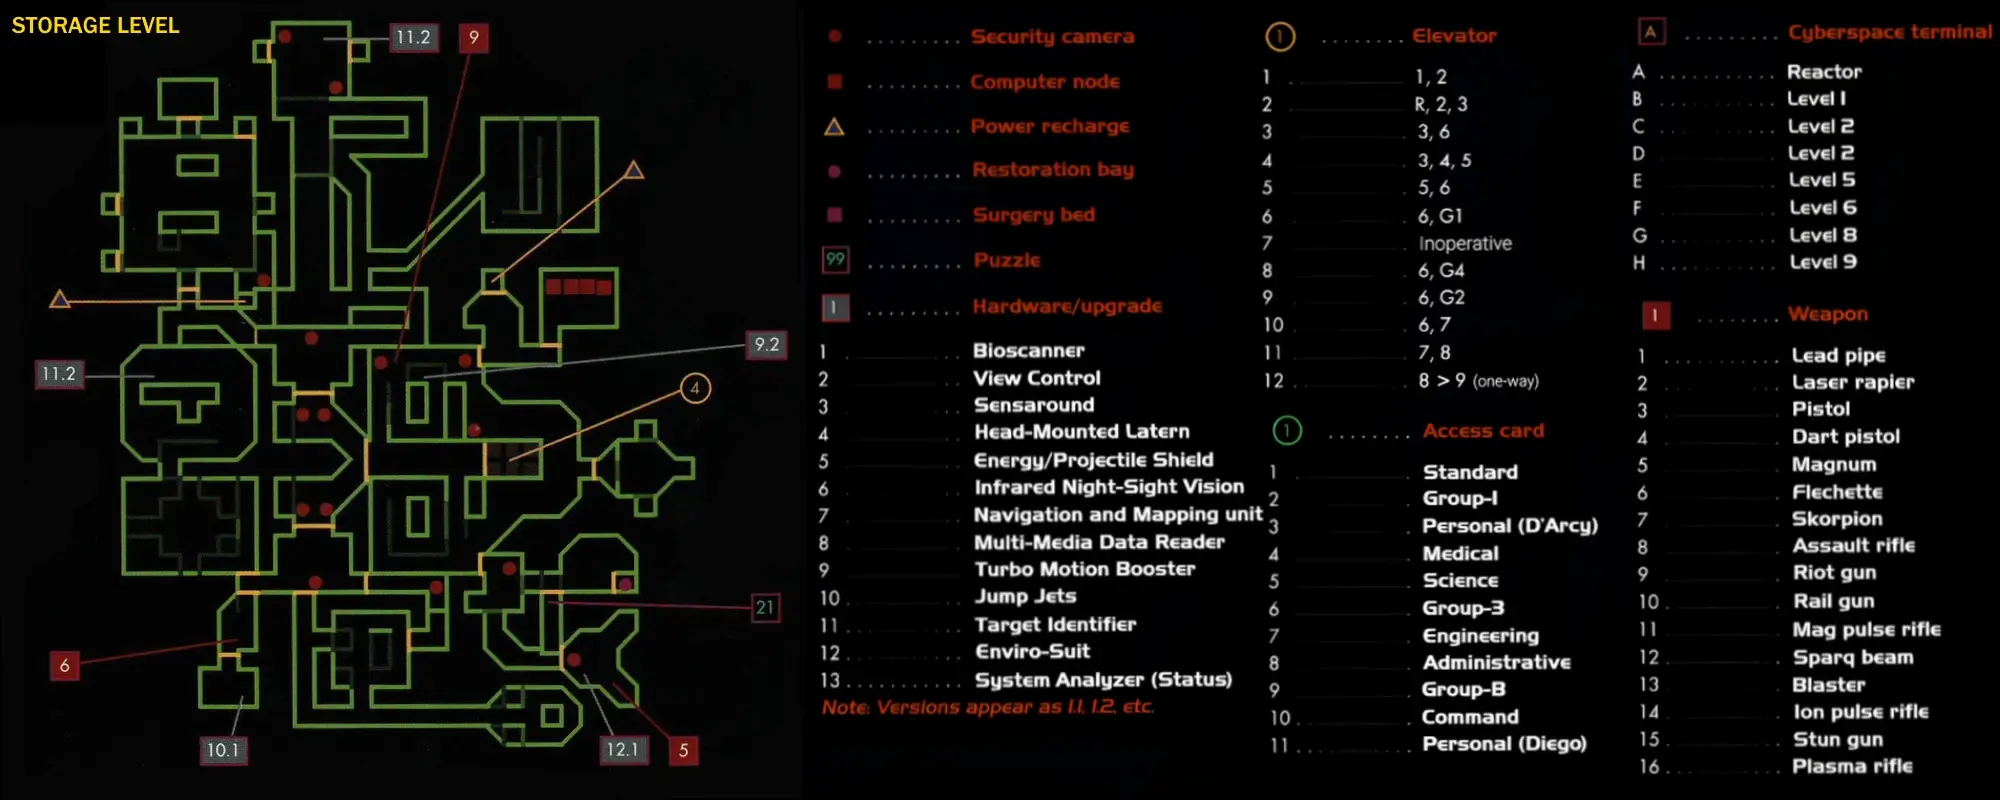
Level 4 – Storage
- Find and acquire an Enviro-Suit from MacLeod’s office.
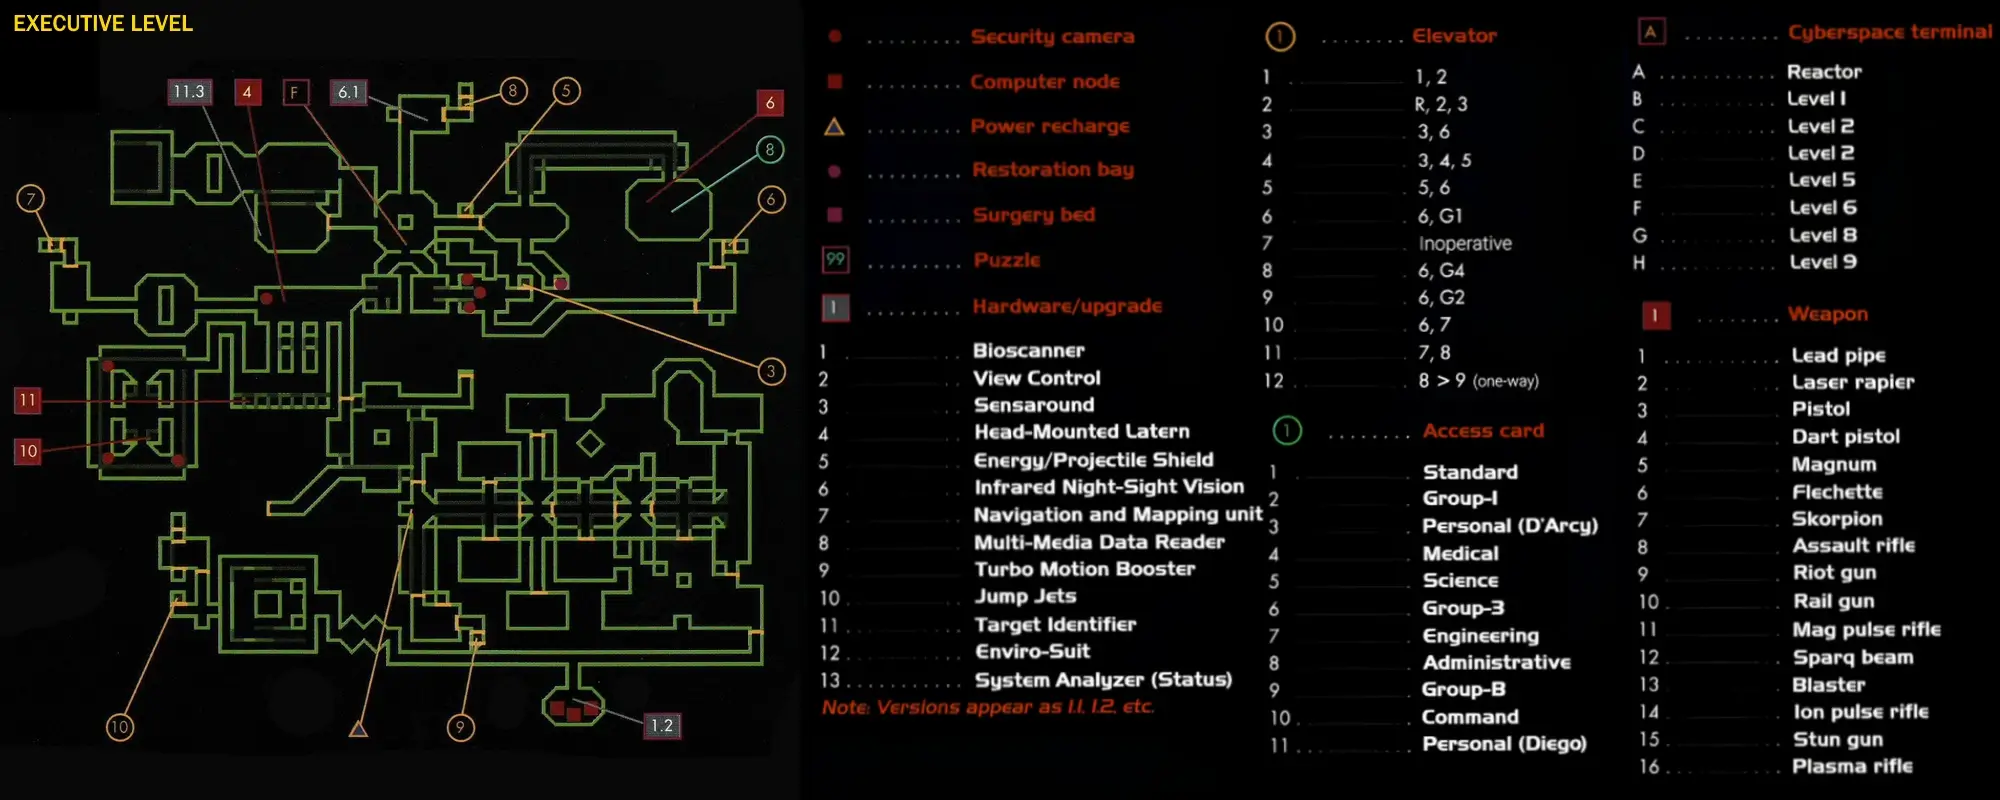
Level 6 – Executive
- In this level, you’re tasked with disabling safety interlocks in Alpha, Delta, and Beta groves. These interlocks likely serve as safety measures to prevent the jettisoning (ejecting) of the groves. You can unlock the elevator to Beta Grove by using a button in the dormitories or through a cyberspace toggle.
- Inside the Beta Grove, you need to enter a specific code into a keypad to open a locked door in the Beta quadrant. Then, pull a lever in Diego’s Shrine to open a secret passage where you’ll find the Jettison Enable Master Control, a master switch you have to pull.
Level 3 – Maintenance Revisited
- At this point, return to Level 3 to retrieve a diagnostic log from the repair bay. You’ll then need to enter the correct code into a relay analyzer keypad. Use a repulsor to get the Interface Demodulator, a tool that allows you to find and repair Relay 428. Remember, this relay repair is only necessary if you’re playing on MISSION difficulty levels 2 and 3.
Level 6 – Executive Revisited
- Finally, you return to Level 6. Here, pull the Jettison Enable Master Control once more, and then pull the jettison lever in the Beta Grove lounge to release the grove and jettison the virus into space where it can do no harm.
Maps:
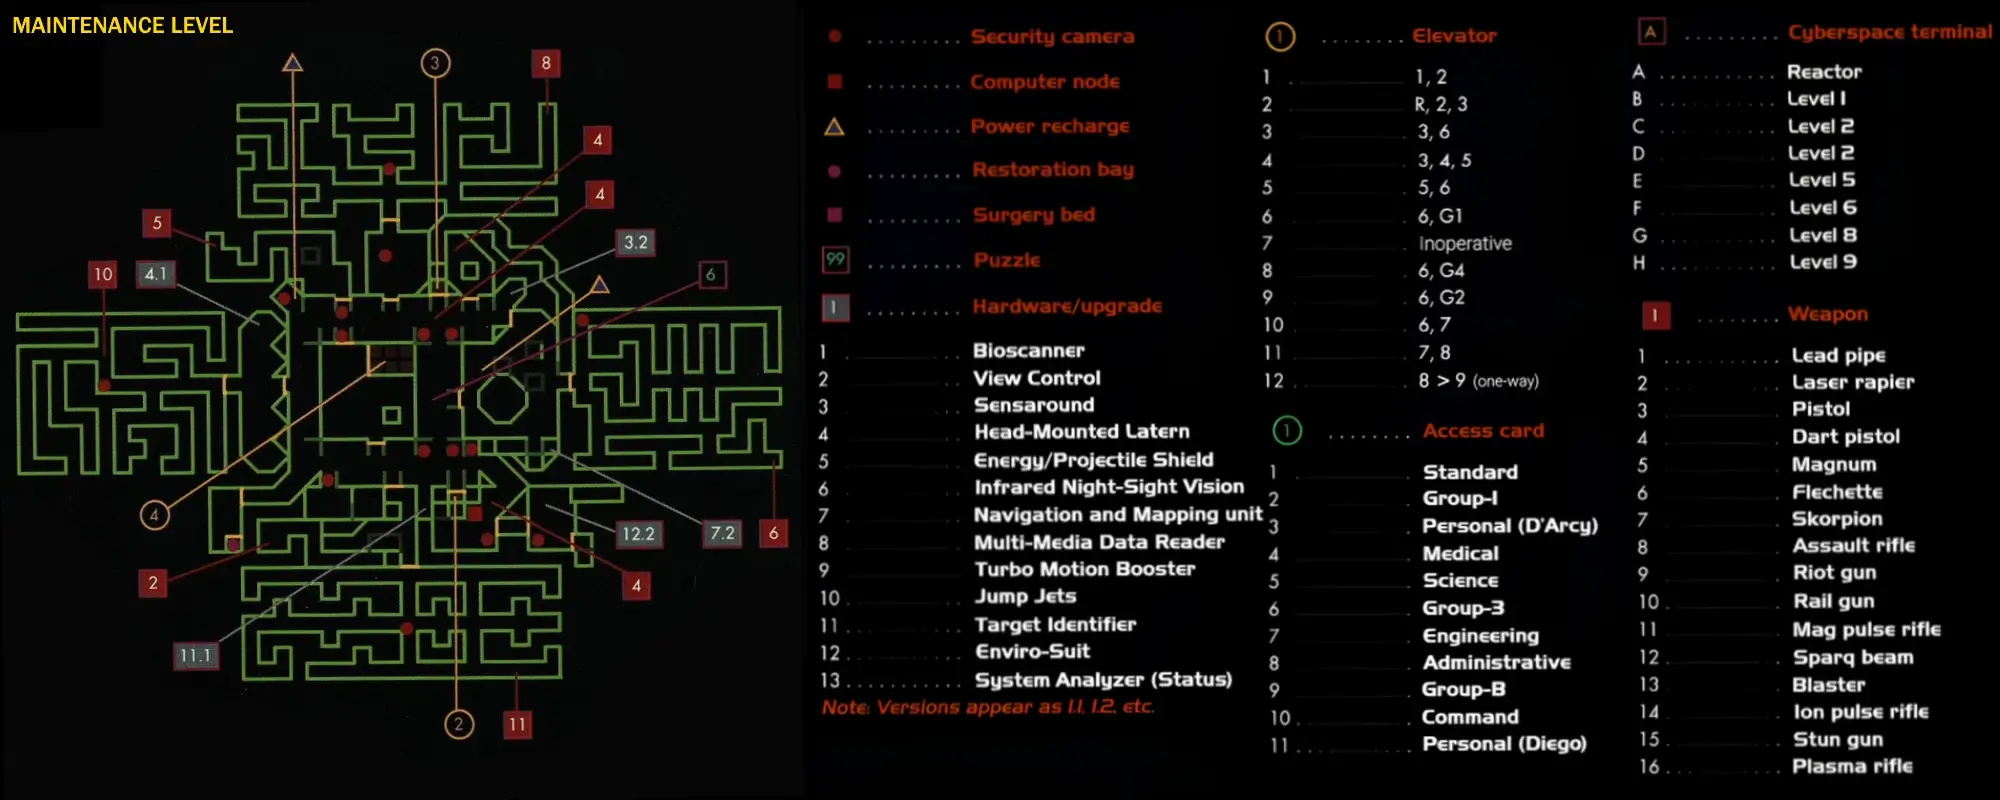
Step by Step Walkthrough:
- Locate the Computer nodes in one corner and destroy them, remember the code.
- Exit the Elevator and Head Left, Turn Right at the end of the hallway.
- Enter the first room on the Left and acquire Headlamp, logs, ammo, and Abe Ghiran’s head.
- Exit back into the hallway and continue on in the same direction.
- After making your way around another corner, enter the first door on the right.
- Enter the Freight Elevator.
- TAKE FREIGHT ELEVATOR TO LEVEL 4.
- Destroy all cameras on level 4 and gain access to storage room 6 (SW from elevator).
- Use Jump boots from Storage room 6 to get plastique in Storage Room 1.
- Find Sabo’s office (Code: 838) and get the Envirosuit Version 1.
- Find the Computer Nodes and destroy them, remember the code on the screen.
- RIDE THE ELEVATOR TO LEVEL 5.
- Open the Freight elevator and fight the sniper across the ravine.
- Locate the Wire puzzle on the left-hand side of the wall outside the elevator.
- Solve the puzzle and activate the force bridge across the ravine to the door.
- Enter the door and turn right, there may be a couple of bots to kill here.
- Climb the ladder to your right and follow the secret tunnel until it branches left and right.
- Head left and go down the ramp to the Computer nodes, destroy and remember the code.
- Head back to the Freight Elevator.
- TAKE FREIGHT ELEVATOR BACK TO LEVEL 3.
- Find elevator that leads to level 6.
- TAKE ELEVATOR TO LEVEL 6.
- Head west through the first room and North through the door.
- Make a right and use the Cyberspace Terminal.
- Turn right and go East through the hall (past the elevator) to the door at the end.
- Go through the door and take care of the three Cyborg Warriors there.
- To the right is a healing bay, walk in and stand around until you figure out what to do.
- Directly across from there is a doorway leading to a well-lighted catwalk, follow it to the next room and acquire the ADM access card and some ammo and stuff.
- Return to the room with the Cyber Terminal and head North to the Delta Grove.
- Get the NightVision Goggles in the lobby and enter the Elevator.
- TAKE ELEVATOR TO DELTA GROVE.
- Go north and east to the jettison enable button and press it.
- TAKE ELEVATOR BACK TO LEVEL 6.
- Return to the room with Cyberterminal.
- Head south through the entrance and take the Left door.
- Before you get to the elevator, there is an entrance on your right, go on in. It’s safe.
- Follow this loooong hallway to the lobby of Alpha Grove, enter the elevator and ride down.
- Go North and east and disable the Jettison switch.
- HEAD BACK TO 6 ON THE ELEVATOR.
- Go back towards the Cyberterminal room.
- Head past the entrance to the Cyberterminal room and go through the other door.
- The next room has a “YOU ARE HERE” map, ignore it. The next room has Cash Machines (which, as always, are out of service) and a ramp leading up to the left, go there.
- Go through the Executive door into the Robot Smoking Area (I can’t figure out why else they’d all be in here) and head to the opposite corner of the room entering the Beta Quadrant.
- Make the first left and head down the hall (Execbots at 3 and 9 o’clock).
- Through the first IRIS door and turn Left, go through there.
- Go through the room until you find a screen with a picture of an elevator with a Virus Mutant in front of it. Flip the switch underneath this Screen to open the Beta Elevator if you haven’t done so in Cyberspace.
- Return to the Iris Door Hallway and Head back the way you came.
- Head left at the end of the hallway and enter the lobby of Beta Grove.
- Enter the Elevator and RIDE DOWN TO BETA GROVE.
- Go South out of the first area and head west.
- Go west to the wall and turn south.
- Follow the Titanium Panel Walkway to the doorway and enter.
- Flip the Jettison enable switch.
- Return to the elevator and RIDE IT UP TO LEVEL 6.
- Exit the lobby and head back down the Iris door hallway.
- At the end of the hall, turn right and go through the door, annihilate the mutant.
- There is a door with a Keypad in the SE corner, go through it (Code: 711).
- Follow the Ventilation shaft to the Computer node room and destroy the nodes (mark the code).
- Return to the ventilation shaft and continue on to the ante chamber to Diego’s Shrine.
- Engage in mass combat with the robot guards here.
- Flip the switch on the back wall and engage Diego.
- Diego uses teleportation to escape at the last minute (cheater), flip the master jettison enable switch to the left of where Diego was.
- Surprise, it didn’t work, head through the door to Diego’s personal chambers and grab logs and read his papers.
- Open the closet if you unlocked it in Cyberspace and get ammo and explosives (What did Diego need with all this crap?).
- On the other side of Diego’s room is a teleporter, use it to transport yourself to the other side of the level.
- Exit the teleporter and find the wall with the hidden door, use this to get back to the elevator.
- RIDE THE ELEVATOR TO LEVEL 3.
- Find diagnostic analyzer by exiting the elevator and turning right, then entering the last room on the right-hand side of the hallway.
- Enter 428 into the keypad.
- Receive instructions for repairing power relay (Replace Broken Interface Demodulator). Where can we get an Interface Demodulator?
- I know! Head for the hallway that cuts across level 3 and has elevators on both ends of it. In this hallway, there is a door on one wall with a wire puzzle.
- Solve the puzzle, enter the room, and find the repulsor lift on the South Wall (the button is to the left).
- Use the repulsor lift and find a grenade, some ammo, and a bunch of demodulators (you only need 1).
- Ride back down and head for the room where we originally found the headlamp.
- Enter the Delta Maintenance Area and go straight, following the corridor until you see a railgun on the ground (it points in the direction you need to go).
- Enter the first hallway to the left and follow it to relay 428, replace the demodulator.
- Return to the elevator and head for level 6.
- Use the teleporter to transport you back to Diego’s chambers.
- Flip the master Jettison switch again and listen to Shodan whine.
- Head back to the ventilation shaft and travel all the way back to the Beta Grove Lobby.
- At this point, Shodan throws some Virus mutants at you, breeze through them with a smile.
- Get into the lobby and open the Door with the Beta Grove Jettison lever, pull it.
- Watch in triumph as the grove is jettisoned and hear Shodan threaten your life (for the millionth time today).
- Head back to Diego’s Chambers and Use the elevator there to travel to level 7.
Antenna Mission
In the Antenna Mission, SHODAN tries to invade Earth’s data networks as its third attempt to conquer Earth after its Virus plan fails. Your primary goal in this mission is to destroy all four data transmission antennas located on the station to prevent SHODAN’s upload.
The mission unfolds in two levels:
Level 4 – Storage
- You are required to collect four charges of the powerful explosive Z-44 plastique. This will be your tool to destroy the antennas.
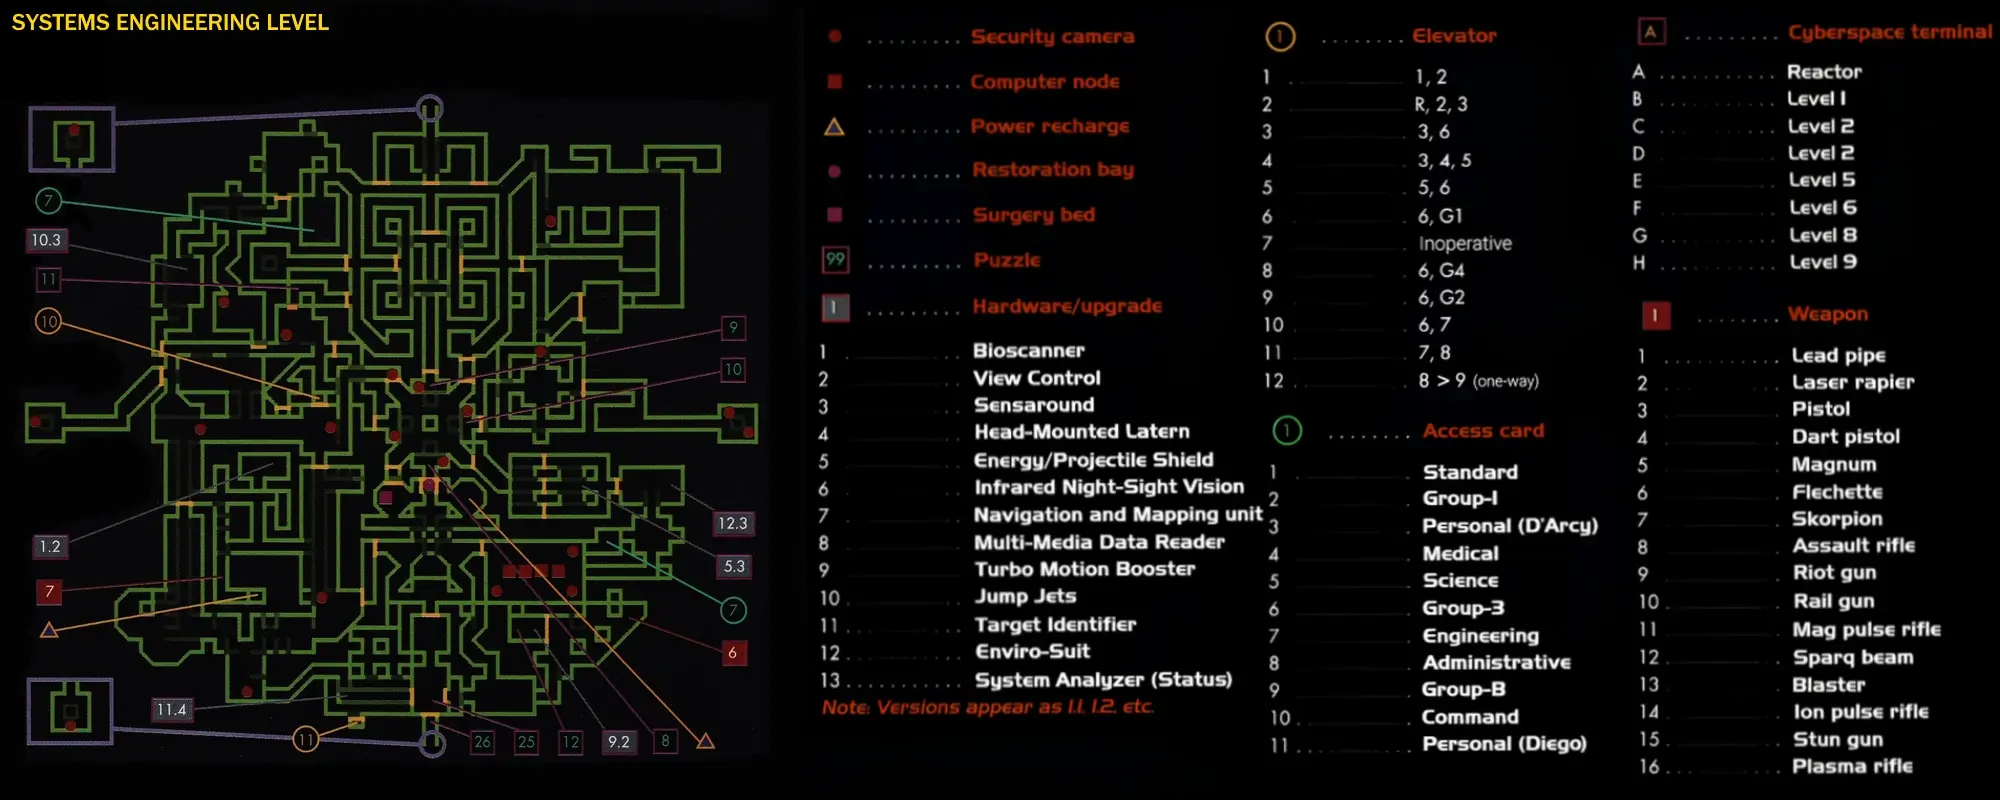
Level 7 – Systems Engineering
- With the explosives in hand, you must find and destroy the four antennas. To do this, open each control panel and use a charge of the Z-44 plastique on each. This action will cause each antenna to explode, thereby preventing SHODAN from uploading itself into Earth’s data networks.
Maps:
Step by Step Walkthrough:
- Exit the elevator and turn to the right (careful of the snipers on the ledges).
- Take the first corridor to the right and make a left at the end of the walkway.
- Climb the ladder and enter the door directly across from there.
- This room contains an antenna, use your plastique and get the heck out.
- Head back to the elevator and take the ramp on the opposite side of it.
- Welcome to the Central Core. You want the Alpha quadrant to your left.
- Carefully make your way down the tunnel. When you reach the top of the next ramp, turn left.
- The second door on the right leads to antenna #2. Do your job.
- Make your way out of here and across the hall to the third story of the Central Hub.
- Make your way to the opposite side and solve the wire puzzle to get into that room.
- Kill the Execbot and press the button on the central column until one of the trap doors in the floor next to you opens up.
- Drop down into the hole in the floor and find the restoration bay, surgery machine, and power station.
- Head back to the room with the trap doors in the floor and use the button to open one of the back trapdoors.
- Drop down and head south until you find a door flanked by Electronics Icons, enter the center.
- Directly ahead is a force door with a Sec-2 bot behind it, behind him is an antenna.
- Solve the wire puzzle, exact death on the bot, and place the plastique.
- SHODAN traps you! Either take the heat or attempt to make an escape. Either way, you’ll be okay if cyborg conversion has been canceled.
- Head north from the antenna room you just destroyed and turn left. Follow this path to a door.
- Open the door and destroy the computer nodes, then head back to the ladder and up to the room with the trap doors in the floor.
- Head back out the door to the third floor of the central hub and make your way to the right side, the Beta Quadrant door.
- There’s a wire puzzle outside the door here. Solve it and make your way through it.
- This will drop you into the inner core, an area like a box with ledges leading around all four sides.
- On one side, there will be a door flanked by Electronics icons. The final antenna is in here. Blast away.
- Make your way back to the elevator and head for the 6th floor.
Reactor Mission
Next, you will be dealing with the “Reactor Mission”. In this mission, SHODAN has a new plan to redirect the space station Citadel out of its orbit and towards Earth. Your task is to prevent this disaster by overloading the station’s reactor using a self-destruct code, which will cause the station to explode.
The self-destruct code is a six-digit number that you can gather from the screens in the computer node rooms on Levels 1-6 (Medical, Research, Maintenance, Storage, Flight Deck, & Executive). Each level will display one digit of the code, which will only become visible when you destroy the computer nodes on that level.
Here is how you carry out this mission across the various levels:
Level 7 – Systems Engineering
- First, retrieve and read a log from the System Administrator’s office. This could potentially provide more details about your mission. After this, make sure to destroy all computer nodes on Levels 1-6 and record the digits displayed on nearby screens.
Level 3 – Maintenance
- You are required to pick up Abe Ghiran’s head and use it on the Retinal Scanner outside his office. This is a security measure to access something crucial inside. Also, remember to pick up the Enviro-Suit present in Ghiran’s office.
Level R – Reactor
- Here, you have to enter the six-digit access code you collected from the destroyed computer nodes on Levels 1-6. Make sure to enter the numbers in the correct order. This action will enable the reactor detonation sequence. Once done, pull the Destruct Sequence lever to initiate the station’s self-destruction.
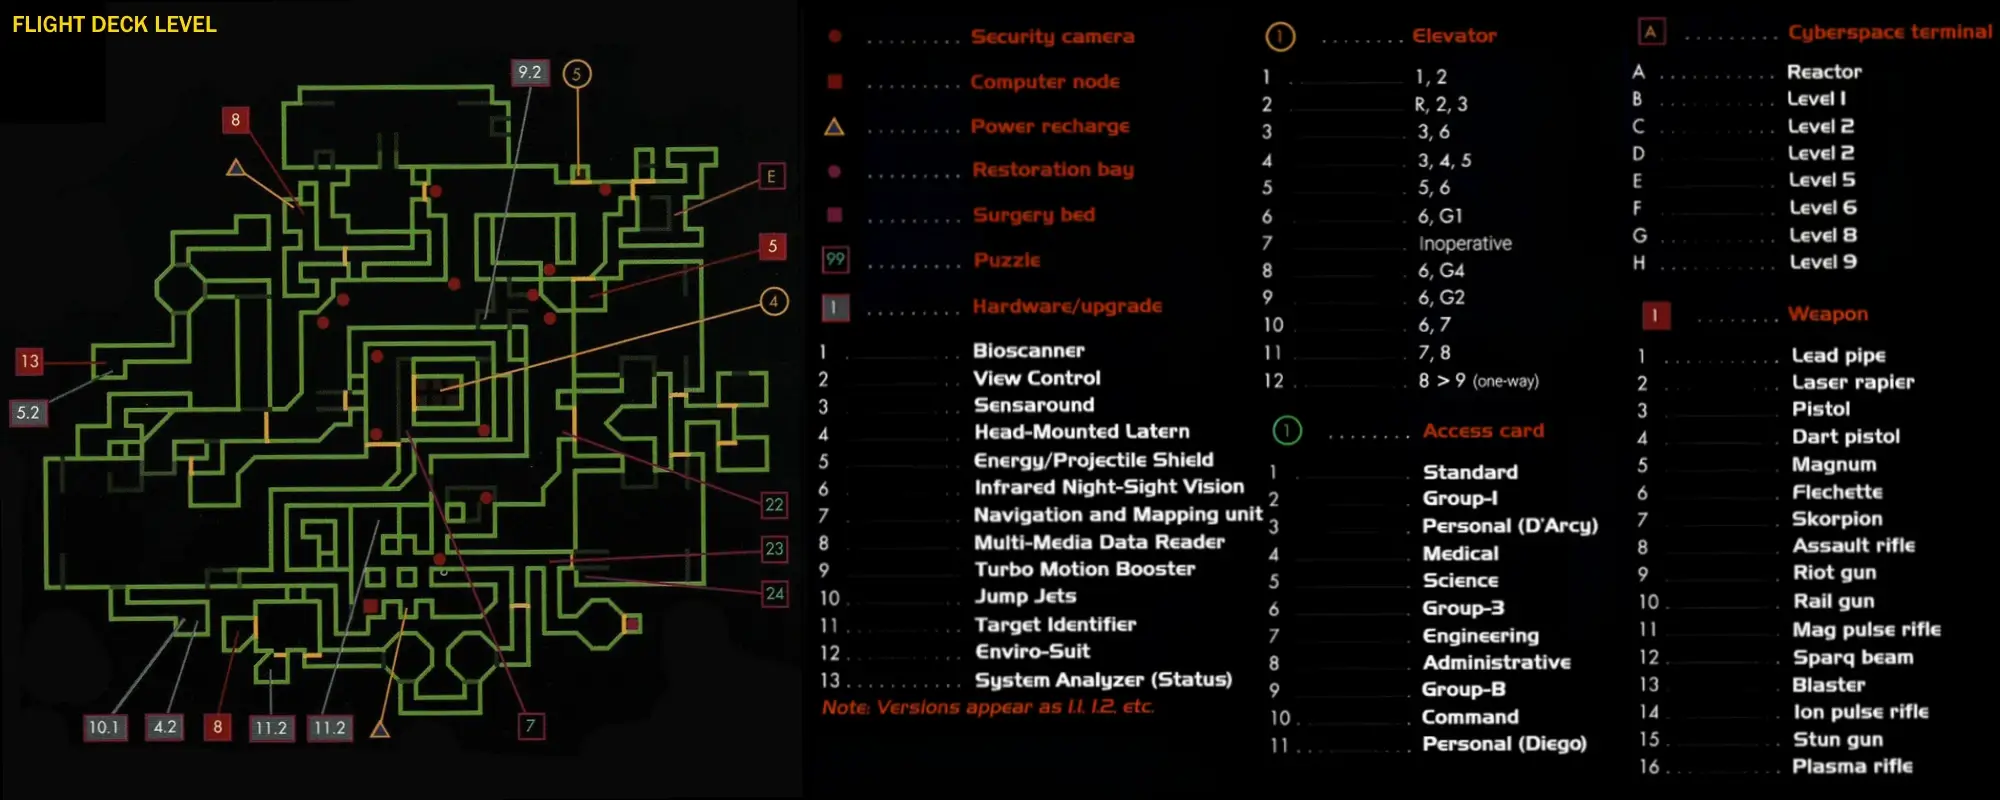
Level 5 – Flight Deck
- Lastly, locate a life pod and enter it using the proper code. Once inside, pull the launch lever to escape from the station before the reactor overload leads to its destruction.
Maps:
Step by Step Walkthrough:
- Head for the elevator to Level 3.
- RIDE TO LEVEL 3.
- Head for the R-2-3 elevator.
- RIDE TO LEVEL R.
- In the center of Level R is the Reactor. Find your way to it.
- In the center of the Reactor is a repulsor lift. Ride it to the Reactor destruct switch.
- Input the code from levels 1-6 and throw the switch to begin the reactor countdown.
- Head back to the elevator and ride it to Level 3.
- Ride the Freight elevator from 3 to Level 5.
- Cross the force bridge to the door opposite the freight elevator.
- Exit the door and travel North through the passage, crossing one trench in the floor.
- Get to the Bulkhead door that allows access to Flight Bays 2 & 3 and enter there.
- Either direction will get you into a flight bay, and there is an iris door to a hallway between the two Bays, that’s where you want to be.
- Hey, there’s Diego! Again! Kick his butt! Again! He teleports away! Again! (Monotony is the key to surviving checklists.)
- Head up the ramp and into one of the escape pods (code: 001), but don’t activate it. Get the first aid kit, then head to the other escape pod and pull the lever.
- The countdown starts and is stopped by SHODAN. (Big surprise.)
- After threatening your life for the millionth time, you have to head back and make your way to the 8th floor. Take the executive elevator.
- Go to Flight Bay 3 and solve the wire puzzle in the corner that opens the iris door.
- Head West through the Node area, up the ramp, and through the secret passage back to the spot where the tunnel turns North and you can drop down into the main hallway of Level 5.
- Head NE towards the sign that says Flight Bays 2 & 3 and turn North.
- Follow that passage until you turn West and cross the trench again.
- Immediately behind the trench is a passage (w/Red Carpeting), take that.
- Turn right at the corner and find the elevator, take it to Level 6.
- Find your way back to Diego’s quarters and take the elevator there to Level 7.
- Exit the elevator and head straight through the door on the opposite wall of the elevator.
- Follow that Catwalk to another door on the left-hand side and enter it (Security must be 18% or less).
- This will lead you to a hallway, take the door at the other end.
- Take a right and head south around the corner, and through the door flanked by Electronics Icons.
- The first door on the right will yield a catwalk with a Mutant Cyborg on it, drop him and acquire Targeter Version 4.
- Carefully make your way to the elevator on the left.
- RIDE THE ELEVATOR TO LEVEL 8.
- Enter Level 8 and get the message “Bridge separation sequence initiated” (or words to that effect).
- Head right and take the third repulsor lift up to the Extraction Area.
- Enter the first room on the right and flip the switch under the screen to open the force door blocking off the next repulsor lift.
- Enter the next room on the right and take the Access card (Group – B) from the dead security guard.
- The room next to the repulsor lift has some useful items in it, get them.
- Ride the repulsor lift up to the next area (much like a central hub area) and ride the repulsor on the South wall up to the next level.
- Cross the force bridge and turn right, enter the doorway to your right and get the Command Access card.
- Exit the room and find the door on the east wall. Go through it, and up the ramp. There will be three doors here: left, right, and straight.
- Go straight and use the Cyberterminal, unlocking everything possible.
- Go out and through the door now on your left and get the Skorpion.
- Go through the last door and destroy the computer nodes.
- Head back down the repulsor lifts to the central hub room and find the door marked Experimental.
- Get the Plasma rifle.
- Head back to ground level and find the working repulsor lift just East of the entrance door.
- Enter the Dark/Security 2-bot room and push the button on the far-right wall to turn on the lights (and activate the bots).
- Find the Repulsor lift in the Northwest corner and use it to ride up to the prison area.
- Go straight across to the Repulsor lift and float down to the next room.
- Turn right, follow the hallway, and turn right at the end. Go through the executive door.
- Enter the room, go left, and head through the blast door.
- Follow the left-hand wall all the way to the end and turn, heading up the ramp.
- Follow that passage to a blue Storage room door, enter it, and engage the Force bridge button there.
- Exit the room and head down the ramp, turning left and exiting through the force door.
- On Ground level, go to the west wall and find two repulsor lifts suspiciously close to one another.
- Use the left one to go up.
- Cross the force bridge and enter the door.
- Go through the radiation and find the (VERY LONG) emergency ladder, climb it Spidey.
- Go straight, open the door, and cross another force bridge to the area marked Bridge (Stop to look down at the scenic view).
- Enter the Bridge area and begin the climactic battle with Diego (He’ll die this time, I promise).
- Once he dies, you’ll get a surprise (His three buddies come out, and you have to waste them too).
- Once EVERYONE is dead, get the access card from Diego and jump on the Elevator.
- You’ll get a v-mail showing the bridge separation.
- RIDE TO LEVEL 9.
Bridge Mission
You are now undertaking the final mission. SHODAN has thwarted your escape in the life-pod and plans to separate the station’s bridge before it explodes. Your mission is to get to the bridge and destroy SHODAN before the separated section reaches Earth.
Here’s how you progress through this mission across two levels:
Level 8 – Security
- You start by getting the Command access card from a room adjacent to the Banquet room.
- Your next objective is to destroy all robots in the Robot-Charging station. Although they’ll be asleep when you find them, they’ll wake up once you start attacking.
- Afterwards, you are to pull a lever in a control room adjacent to the Detention center. This lever controls the force bridge, possibly creating a bridge for you to cross over.
- Finally for this level, you must defeat the Diego cyborg and his minions in a challenging combat scenario.
Level 9 – Bridge
- The final level starts with three wire puzzles you need to solve. Successful completion of these puzzles will lower the force doors to the room with the chipset receptacle.
- In the same level, retrieve the Isolinear chipset from a prison cell. Once obtained, you should place the Isolinear chipset into the receptacle, which will open the bridge doors.
- Your final task in this mission is to defeat SHODAN. This is accomplished by using the cyberjack terminal for a direct combat against the rogue AI.
Maps:

Step by Step Walkthrough:
- At some point, you’ll get a v-mail showing the station’s destruction.
- Exit the elevator on 9 (Check out the cool “breathing” walls) and turn right.
- Go straight until you see a duralloy paneling wall, open it, it’s a hidden door.
- To one side of the hidden door is the entrance to a puzzle room. Head on in.
- There will be a cubicle (empty) with a button in it, press the button and hear a door open.
- There will be one Sec-2 bot in the open, shoot him and push the button in the wall of his cubicle. Repeat the above steps until the button opens up the center section. Walk out on the forcebridge (Conveniently placed) and solve the puzzle to open one of the force doors to the computer room.
- Exit the puzzle room and head back towards the elevator. On the other side of the elevator is a door leading into another puzzle room.
- Go in and find the button on the left wall, pushing it will drop you into the maze.
- Wander around the maze until you find a wire puzzle, then solve it, opening force door -2 to the computer room.
- Wander around the maze until you find a repulsor lift, ride it up to the level.
- Head out of the puzzle room and head south to the next door to the right.
- Kill the Mutant Cyborg and press the button on the right wall.
- Get teleported into the center cage with the remains of Bianca Shuler, grab ISOLINEAR CHIPSET and bail! (use the button).
- Exit the Isolinear chipset room and continue heading south.
- In the far Southeast corner is a room with an entrance shaped like a triangle, enter this room.
- Go up the ramp and wait for the guard to drop the force wall, then assassinate him.
- Cross the force bridges (trust me, they’ll open) and head right, down the ramp on the far side.
- Welcome to the autobomb maze, be sure to bring plenty of medi-patches.
- Wander around until you find the wire puzzle and solve it, opening the last door to the computer room.
- Exit the autobomb maze where you came in and head West.
- Take the first entrance to the south and follow the passage past one door, and turn left into the next entrance (The Computer room).
- On the northwest corner of this room is a circuit board slot, use the isolinear chipset here. This diverts the security program and allows you access to the Central area. Exit the room now.
- Make your way back to the main hallway and follow it until you see a doorway to the Central area.
- There will be a ramp going up at this point, go up it.
- Once you’re at the top of the ramp, you’ll be on a catwalk area. In the center of this is a cyber terminal.
- Fight your way past the Cyborg Elite and use the Terminal.
- Now you’re in Cyberspace with SHODAN, make your way to his chamber and defeat him.
- Watch the endgame. You’re done.
All credit for these guides goes to Tuesday Frase and Todd Bailey.


Comments
Thank you, saved my day with this! Many thanks >_<